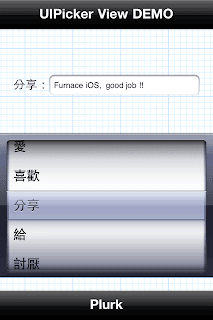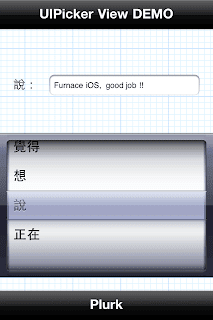

UIPick View 的作用類似於網頁上的下拉式選單(Option),使用捲軸滾動的方式選擇相同屬性內的不同數值,而此元件也可以直接從 Interface Builder 內拉出使用,其方式如下。
首先從 Interface Builder 的物件群內拉出 UIPick View 物件,接著按回到 ViewController.h 中設定代理與介面物件的 @property。
@interface UIPickerViewController : UIViewController <UIPickerViewDataSource, UIPickerViewDelegate> {


    NSArray *plurk;

    IBOutlet UILabel *plurkLabel;

    IBOutlet UIPickerView *plurkPicker;

}


@property (nonatomic, retain) UIPickerView *plurkPicker;

@property (nonatomic, retain) UILabel *plurkLabel;

@end
上述程式碼中的 NSArray 是用來存放 UIPick View 物件內的值,之後也將透過 NSArray 與 UIPick View 做互動,藉由 UIPick View 來決定索引 Index 再由 NSArray 中取出值並顯示。
再來回到 ViewController.m 中,將記憶體釋放與實做 @property 的方法處理好。
@synthesize plurkPicker, plurkLabel;


- (void)dealloc

{

    [plurk release];

    [plurkPicker release];

    [plurkLabel release];

    [super dealloc];

}
接著再程式進入點的地方設定好 NSArray 內的值與代理,就完成基本的環境設置。
plurk = [[NSArray alloc] initWithObjects:@"愛", @"喜歡", @"分享", @"給", @"討厭", @"想要", @"期待", @"需要", @"打算", @"希望", @"問", @"已經", @"曾經", @"好奇", @"覺得", @"想", @"說", @"正在", nil];


plurkPicker.dataSource = self;

plurkPicker.delegate = self;
下列程式碼將示範四個內建的函式,他們的主要作用是用來設定 UIPick View 一共有幾組選項(有幾個 NSArray)、每組選項的項目數目(NSArray 的長度)、將每個項目顯示於 UIPick View 上以及當選擇 UIPick View 內的項目時所會觸發的函式。
//內建的函式回傳UIPicker共有幾組選項

- (NSInteger)numberOfComponentsInPickerView:(UIPickerView *)pickerView {

    return 1;

}
//內建的函式回傳UIPicker每組選項的項目數目

- (NSInteger)pickerView:(UIPickerView *)pickerView numberOfRowsInComponent:(NSInteger)component {


    //第一組選項由0開始

    switch (component) {

        case 0:

            return [plurk count];

        break;


        //如果有一組以上的選項就在這裡以component的值來區分(以本程式碼為例default:永遠不可能被執行

        default:

             return 0;

        break;

    }

}
//內建函式印出字串在Picker上以免出現"?"
- (NSString *)pickerView:(UIPickerView *)pickerView titleForRow:(NSInteger)row forComponent:(NSInteger)component {
switch (component) {
case 0:
return [plurk objectAtIndex:row];
break;
//如果有一組以上的選項就在這裡以component的值來區分(以本程式碼為例default:永遠不可能被執行)
default:
return @"Error";
break;
}
}
//選擇UIPickView中的項目時會出發的內建函式

- (void)pickerView:(UIPickerView *)pickerView didSelectRow:(NSInteger)row inComponent:(NSInteger)component {

    plurkLabel.text = [NSString stringWithFormat:@"%@ :", [plurk objectAtIndex:row]];

}
最後也可透過下列程式碼設定 UIPick View 內的初始值,讓程式在一顯示 UIPick View 時就會自動捲動到該預設值。
//設定UIPicker所要顯示的內定值

[plurkPicker selectRow:16 inComponent:0 animated:YES];
注意在設定起始值時,必須小心不可以超過陣列的範圍,上述程式碼有由於只有一組選項,所以在 inComponent 值設定為 0,表示是第一組選項的第 16 的值。


沒有留言:
張貼留言